Source
https://medium.com/deepquestai/train-object-detection-ai-with-6-lines-of-code-6d087063f6ff
Train Object Detection AI with 6 lines of code

Step-by-step tutorial on training object detection models on your custom dataset

Object detection is one of the most profound aspects of computer vision as it allows you to locate, identify, count and track any object-of-interest in images and videos. Object detection is used extensively in many interesting areas of work and study such as:
- autonomous vehicles
- security
- pedestrian/crowd detection
- plate number and vehicle detection
- industrial automation (E.g item picking and sorting)
- robotics and more.
A number of pre-collected object detection datasets such as Pascal VOC, Microsoft’s COCO, Google’s Open Images are readily available along with their pre-trained models for detection and identifying only a fix set of items.
However, the challenge with using these public datasets and pre-trained models is that they do not provide a convenient way for you to easily train new object detection models to detect and identify your desired object(s) of interest. Since the past one year that I published my first Object Detection article “Object Detection with 10 lines of code”, I have received thousands of request from developers, teams, students and researchers who desire to detect their own objects-of-interest in images and videos, beyond the 80 classes provided in the COCO dataset and 600 classes provided in the Open Images dataset.
I am most glad to announce that with the latest release of ImageAI v2.1.0, support for training your custom YOLOv3 models to detect literally any kind and number of objects is now fully supported, and that is what we will guide you to do in this tutorial. Let’s get started.
For the purpose of this tutorial, we will be using Google Colab to train on a sample dataset we have provided. Follow the steps below.
Step 1 — Preparing your dataset
For your custom detection training, you have to provide sample images ( your image dataset ) for training your model and validating the model after training for accuracy. ImageAI detection training supports the Pascal VOC format for your custom dataset. For the purpose of this tutorial, we have provided a sample dataset for the Hololens Mixed Reality headset, on which we will train a model that can detect and identify the Hololens in pictures and videos. You can download the sample dataset via the link below.
If you want to train on your own images for your custom object(s), follow the instructions below.
- Decide the type of object(s) you want to detect and collect about 200 (minimum recommendation) or more pictures of each of the object(s)
- Once you have collected the images, you need to annotate the object(s) in the images. ImageAI uses the Pascal VOC format for image annotation. You can generate this annotation for your images by following a step-by-step tutorial we have provided via the link below.
- Once you have the annotations for all your images, create a folder for your dataset (E.g headsets) and in this parent folder, create child folders train and validation
- In the train folder, create images and annotations sub-folders. Put about 70–80% of your dataset images in the images folder and put the corresponding annotations for these images in the annotations folder
- In the validation folder, create images and annotations sub-folders. Put the rest of your dataset images in the images folder and put the corresponding annotations for these images in the annotations folder
- Once you have done this, the structure of your image dataset folder should look like the sample below:
>> train    >> images       >> img_1.jpg
            >> images       >> img_2.jpg
            >> images       >> img_3.jpg
            >> annotations  >> img_1.xml
            >> annotations  >> img_2.xml
            >> annotations  >> img_3.xml


>> validation   >> images       >> img_151.jpg
                >> images       >> img_152.jpg
                >> images       >> img_153.jpg
                >> annotations  >> img_151.xml
                >> annotations  >> img_152.xml
                >> annotations  >> img_153.xml
Step 2 — Installing ImageAI and Dependencies
Go to https://colab.research.google.com and create a new Python3 notebook. Ensure you change the runtime for your new notebook to a GPU. Then:
- Run the command below to download the sample hololens dataset
!wget https://github.com/OlafenwaMoses/ImageAI/releases/download/essential-v4/hololens.zip
- Unzip the zip file for the hololens dataset
!unzip hololens.zip
- For the purpose of this training, install Tensorflow GPU version 1.13.1. This is because the default Tensorflow GPU version installed on your notebook does generate a ‘_TfDeviceCaptureOp’ object has no attribute ‘_set_device_from_string’ error when training your model. If you receive a prompt that your notebook requires a restart after the installation, do restart your notebook after the installation.
!pip3 install tensorflow-gpu==1.13.1
- Then install the latest version of ImageAI from PIP
!pip3 install imageai --upgrade
Step 3 — Initiate your detection model training
To ensure that our trained custom models have better detection accuracy, we will be using transfer learning from a pre-trained YOLOv3 model in the training. ImageAI provides the option to train with and without transfer learning. I will strongly recommend you use transfer learning except you have thousands of object samples in your dataset.
- Download the pre-trained YOLOv3 model
!wget https://github.com/OlafenwaMoses/ImageAI/releases/download/essential-v4/pretrained-yolov3.h5
- Then run the training code as seen below
SIMPLE! The above 6-lines of code is all you need to initiate the training on your custom dataset. Now let’s break down the code to its part:
- In the first line, we import the “DetectionModelTrainer” class from ImageAI
- In the 2nd and 3rd lines, we created an instance of the class and set our model type to YOLOv3
- In the 4th line, we set the path to our custom dataset
- In the 5th line, we specified the following parameters:
— object_names_array: This is an array of the names of all the objects in your dataset. Please note that if your custom dataset annotation has more than one object, simple set the values as shown in the example below
object_names_array = ["hololens", "google-glass", "oculus"]
— batch_size: This is the batch size for the training. Kindly note that the larger the batch size, the better the detection accuracy of the saved models. However, due to memory limits on the Nvidia K80 GPU available on Colab, we have to keep this value as 4. The batch size can be values of 8, 16 and so on.
— num_experiments: This is the number of times we want the training code to iterate on our custom dataset.
— train_from_pretrained_model: This is used to leverage transfer learning using the pretrained YOLOv3 model we downloaded earlier.
Once the training starts,
- ImageAI will generate detection_config.json file in the hololens/json folder. This JSON file will be used during detection of objects in images and videos
- ImageAI will create hololens/models folder which is where all generated models will be saved
- You will see at the log like the sample details below.
Using TensorFlow backend.
Generating anchor boxes for training images and annotation...
Average IOU for 9 anchors: 0.78
Anchor Boxes generated.
Detection configuration saved in  hololens/json/detection_config.json
Training on:  ['hololens']
Training with Batch Size:  4
Number of Experiments:  200


Epoch 1/200
 - 733s - loss: 34.8253 - yolo_layer_1_loss: 6.0920 - yolo_layer_2_loss: 11.1064 - yolo_layer_3_loss: 17.6269 - val_loss: 20.5028 - val_yolo_layer_1_loss: 4.0171 - val_yolo_layer_2_loss: 7.5175 - val_yolo_layer_3_loss: 8.9683
Epoch 2/200
 - 648s - loss: 11.1396 - yolo_layer_1_loss: 2.1209 - yolo_layer_2_loss: 4.0063 - yolo_layer_3_loss: 5.0124 - val_loss: 7.6188 - val_yolo_layer_1_loss: 1.8513 - val_yolo_layer_2_loss: 2.2446 - val_yolo_layer_3_loss: 3.5229
Epoch 3/200
 - 674s - loss: 6.4360 - yolo_layer_1_loss: 1.3500 - yolo_layer_2_loss: 2.2343 - yolo_layer_3_loss: 2.8518 - val_loss: 7.2326 - val_yolo_layer_1_loss: 1.8762 - val_yolo_layer_2_loss: 2.3802 - val_yolo_layer_3_loss: 2.9762
Epoch 4/200
 - 634s - loss: 5.3801 - yolo_layer_1_loss: 1.0323 - yolo_layer_2_loss: 1.7854 - yolo_layer_3_loss: 2.5624 - val_loss: 6.3730 - val_yolo_layer_1_loss: 1.4272 - val_yolo_layer_2_loss: 2.0534 - val_yolo_layer_3_loss: 2.8924
Epoch 5/200
 - 645s - loss: 5.2569 - yolo_layer_1_loss: 0.9953 - yolo_layer_2_loss: 1.8611 - yolo_layer_3_loss: 2.4005 - val_loss: 6.0458 - val_yolo_layer_1_loss: 1.7037 - val_yolo_layer_2_loss: 1.9754 - val_yolo_layer_3_loss: 2.3667
Epoch 6/200
 - 655s - loss: 4.7582 - yolo_layer_1_loss: 0.9959 - yolo_layer_2_loss: 1.5986 - yolo_layer_3_loss: 2.1637 - val_loss: 5.8313 - val_yolo_layer_1_loss: 1.1880 - val_yolo_layer_2_loss: 1.9962 - val_yolo_layer_3_loss: 2.6471
Epoch 7/200
Step 4 — Evaluate your models
In the sample log shown above, new models are saved based on the decrease in the validation loss (E.g — loss: 5.2569) . In most cases, the lower the loss, the more accurate the model will be detecting objects in images and videos. However, some models may experience overfitting and still have lower losses. To ensure that you pick the best model for your custom detection, ImageAI allows you to evaluate the mAP (mean Average Precision, read more about it here) of all the trained models saved in the hololens/models folder.
The higher the mAP, the better the detection accuracy of the model.
Simple run the code below on the models saved during the training.
When you run the above code, you get a result like the example below.
Model File:  hololens/models/detection_model-ex-07--loss-4.42.h5
Using IoU :  0.5
Using Object Threshold :  0.3
Using Non-Maximum Suppression :  0.5
hololens: 0.9231
mAP: 0.9231
===============================
Model File:  hololens/models/detection_model-ex-10--loss-3.95.h5
Using IoU :  0.5
Using Object Threshold :  0.3
Using Non-Maximum Suppression :  0.5
hololens: 0.9725
mAP: 0.9725
===============================
Model File:  hololens/models/detection_model-ex-05--loss-5.26.h5
Using IoU :  0.5
Using Object Threshold :  0.3
Using Non-Maximum Suppression :  0.5
hololens: 0.9204
mAP: 0.9204
===============================
Let’s breakdown the evaluation code:
- In the first 4 lines, we import the same training class, created the class instance, set the detection model type and and set the path to our dataset’s directory.
- In the 5th line, we called the .evaluateModel function and specified the parameters below
— model_path: This is the path to the folder containing our models. It can also be the filepath to a specific model.
— json_file: This is the path to the detection_config.json file saved during the training.
— iou_threshold: This is our desired minimum Intersection over Union value for the mAP computation. It can be set to values between 0.0 to 1.0
— object_threshold: This is our desired minimum class score for the mAP computation. It can be set to values between 0.0 to 1.0.
— nms_threshold: This is our desired Non-maximum suppression for the mAP computation.
Step 5 — Detecting our custom Object in an image
Now that we have trained our custom model to detect the Hololens headset, we will use the best model saved as well as the detection_config.json file generated to detect the object in an image.


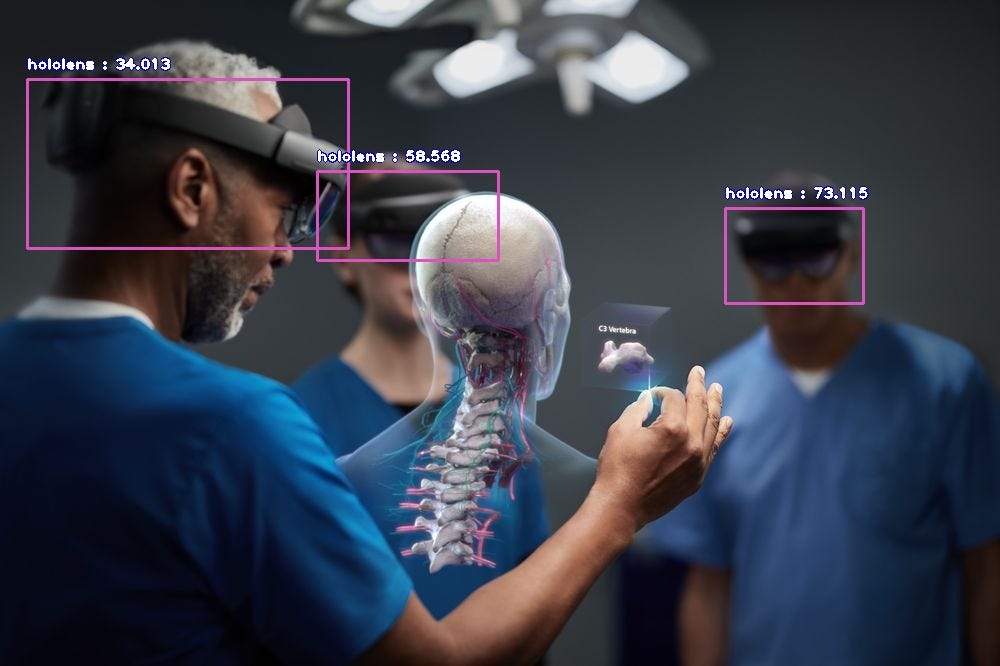
- Let’s take the above sample image to test our trained custom hololens detection model.
- We have provided an already trained Hololens detection model for you to test. Download the model and the corresponding detection_config.json file via the links below.
https://github.com/OlafenwaMoses/ImageAI/releases/download/essential-v4/hololens-ex-60--loss-2.76.h5
- Now let’s run our custom hololens detection code as seen below.
When we run the above code, we get the result below.
— RESULT —
hololens  :  34.01297628879547  :  [27, 79, 348, 248]
hololens  :  58.56814980506897  :  [317, 171, 498, 260]
hololens  :  73.11487197875977  :  [725, 208, 863, 303]
VOILA! Now we have been able to successfully train a new detection model to detect the Hololens Mixed Reality headset.
If you enjoyed this article, give it as many claps as you will like to. Also share with friends and colleagues as well.


The Colab Notebook containing all the codes in this tutorial is available via the link below.
On a final note, ImageAI also allows you to use your custom detection model to detect objects in videos and perform video analysis as well. See the documentations and the sample codes links provided below.
Video Detection Documentation:
Example codes:
If you will like to know everything about how object detection works with links to more useful and practical resources, visit the Object Detection Guide linked below.
The ImageAI project and this tutorial brought to you by DeepQuest AI.
At DeepQuest AI, our mission we chose to accept is to advance and democratize Artificial Intelligence, and make it accessible to every individual and organization on the planet.
DeepQuestAI
Our Mission which we choose to accept is to advance and democratize Artificial Intelligence and make it accessible to every individual and corporate entity of all sizes everywhere on the planet. https://www.deepquestai.com
WRITTEN BY
Co-Founder & CEO at DeepQuest AI. A self-Taught computer programmer, Deep Learning, Computer Vision Researcher and Developer. http://olafenwamoses.me